Chapter 4 – The 3-Step Process Documenter, page 55.
Step 1: Identify Your Handful of Core Processes
- Remind everyone on the team that we are taking a 20/80 approach.
- We will focus our attention on the handful of core processes – five to twelve important things you do repeatedly – which make your organization unique and valuable.
- Example List of Core Processes
- HR
- Marketing
- Sales
- Acct Mgt/Cust Svc
- Ops 1
- Ops 2
- Ops 3
- Accounting
- Running the Business
- Special Note:
- Common Question: What’s the difference between a “Proven Process” and a “Core Process”?
- Answer: a “Proven Process” is part of your company’s marketing strategy. It is a 1-page visual illustration of your ideal customer experience from their perspective.
- If certain activities are important enough to callout in your Proven Process, they probably deserve consideration when identifying and documenting your Core Processes.
- Common Question: What’s the difference between a “Proven Process” and a “Core Process”?
Leadership Team “Identify Core Processes” Exercise:
- Take 5 quiet minutes and record your own list.
- Compile a list on a whiteboard.
- Starting with the first item on the list, ask, “Is this one of our Core Processes?”
- If “Yes” ask “What Should we call it?”
- If “No” ask “Is this a major step in some other core process?”
- If “Yes” decide which other core process it belongs to and draw a line to the relevant core process.
- If “No” cross out the item.
- Go to the next item on the list and repeat the steps, begin by asking “Is this one of our Core Processes?”
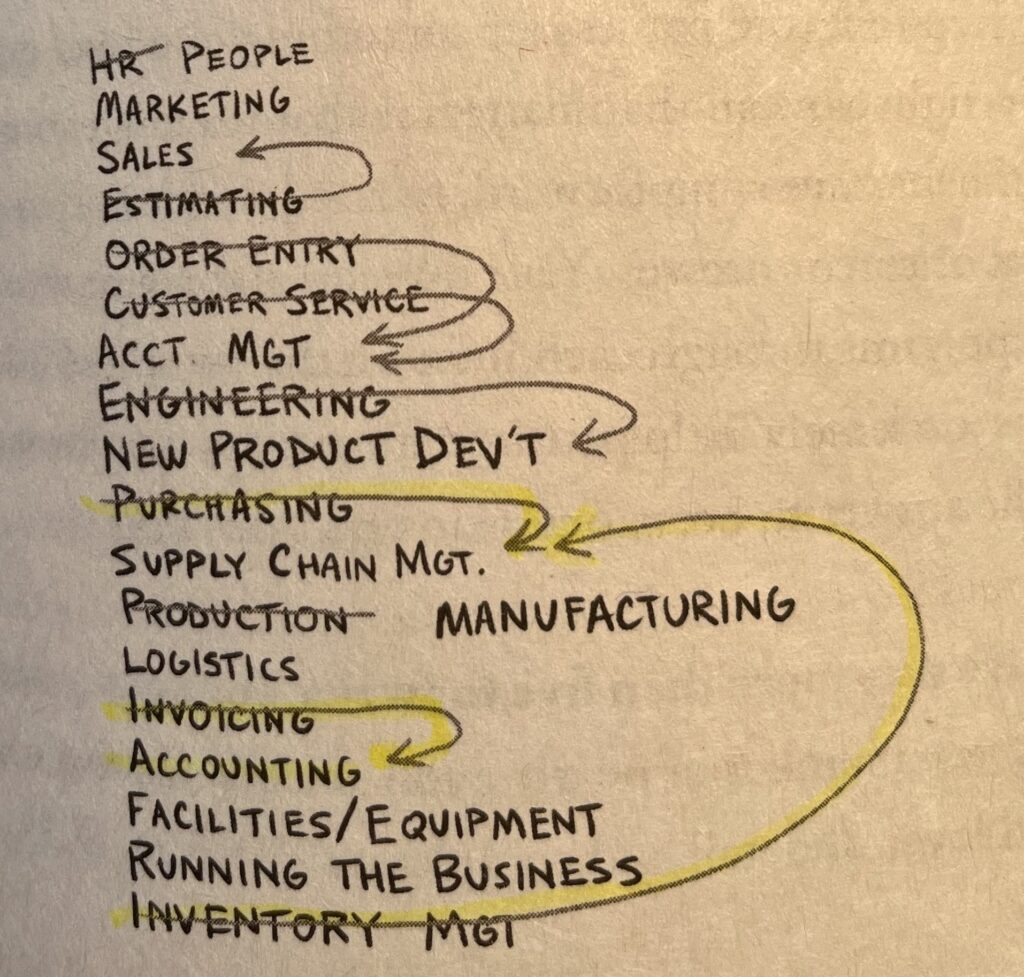
- When you finish the prioritization exercise, you will end up with a list of core processes on the whiteboard that look something like this:
- Important: Once your team has decided on the core processes, get the team to agree on what you are going to call each of them, forever.
- To complete step one of the 3-Step Process Documenter, ask a member of your team to turn the final list from the whiteboard into a table of contents for the manual, share drive, and/or video library that – someday soon – will house your handful of documented simplified core processes.
Step 2: Document and Simplify Each Core Process
- At the same meeting, and as a team:
- Identify a Core Process Champion for the Company.
- Decide which core processes should be documented first.
- Decide which seat in your Accountability Chart will own the core process.
- Decide who is going to take ownership of documenting and simplifying each core process.
- Decide what the final product should look like.
- Decide when each core process will, as well as the entire project, be completed.
- Update your 3-Year Picture and 1-Year Plan and publicly commit to your team’s core process goals.
- Once the project team has created a draft of a documented and simplified core process, the project leader and/or the core process seat owner presents it to the leadership team for review, revision, and approval.
- What should the final process documentation look like? That’s up to the team.
- Documents
- Workflow Diagram
- Series of images
- Infographics
- Checklists
- Videos
- Etc.
- Special Notes:
- Make sure the team agrees on the timeline for documenting, simplifying, and getting each core process approved by the leadership team.
- When a company running on EOS wants to strengthen its Process Component, that broader initiative often shows up as one of the three to seven goals in the 1-Year Plan.
- With priorities for the year set, leadership team members are reminded every 90 days to prioritize the Rocks that will achieve the company’s goals for the year.
- So each quarter, documenting, simplifying, and getting core processes approved by the leadership team might be a company or individual rock.
- This core process journey typically takes companies between nine and twelve months to complete.
- Documentation
- Don’t just do something, stand there!
- Begin the documentation journey with one simple step. Simply observe.
- “To acquire knowledge, one must study; but to acquire wisdom, one must observe.” – Marilyn vos Savant
- The best way to start documenting and simplifying a core process is by taking time to truly understand it, from start to finish.
- If you try to fix or optimize everything the first time you observe it, you’ll never see the big picture
- The first thing you’ll notice is whether a consistent way of doing it already exists.
- As you observe, keep asking yourself:
- What seems to be working?
- What’s not working?
- Does that happen every time or just occasionally?
- Feel free to take notes, make drawings, take pictures, record a video, etc.
- At the end of the documentation ask yourself:
- What is the objective of this process? (and how can we measure it?)
- What’s the first (and last) step of this process?
- Are we consistently getting the results we want?
- What are the keys to the success of this process?
- What causes problems?
- “If you can’t explain it simply, you don’t understand it well enough.” – Albert Einstein
- Document and Simplify:
- Keep this at a high level.
- Stay focused on the major steps.
- A major step is one of the five to twenty-five things you need to get right every time.
- For each major step, briefly explain the who, what, when, where, and how with a series of sub-steps (some people call these Standard Operating Procedures (SOPs)).
- About two to five bullets for each major step.
- Think one-page checklist, not a three-ring binder.
- Document the basics and build from there (over time).
- Pro Tips: Completing Step 2
- Use an EOS tool call “Getting What You Want”:
- Begin with the desired end in mind.
- Ask yourself, “What Do I Want from this Process?”
- State the desired outcome clearly, simply, and specifically.
- Work backward, recording only the steps that must be done well in order to produce the desired outcome.
- This tool can help you identify leading indicators – those activity-based numbers that predict the final results of the process.
Leadership Team Review and Approve
- Draft a documented, simplified core process to share with your leadership team.
- Meet with the leadership team to thoroughly review and approve the draft core process.
- This is an essential step for three reasons:
- To get the process right
- The most experienced and knowledgeable group in the company.
- Many core processes span multiple departments.
- Ask questions, poke holes, and suggest improvements.
- “None of us are as smart as all of us.” – One Minute Manager
- To be 100% on the same page
- To drive change and accountability, you’ll need to rely on the support of your fellow leaders.
- When they are included and committed, they’ll join you in driving accountability.
- To Save Time
- When a team is aligned behind a core process with measurements, it saves time in the future when getting to the root causes of issues in the business.
Leadership Team Review Meeting
- Share the documented and simplified core process with each member of the leadership team one week before the meeting.
- Ask everyone to come prepared with questions, comments, and issues.
- At the meeting, walk through the process one step and sub-step at a time.
- Answer questions and resolve issues.
- Conclude the meeting with a marked-up copy of the process and a deadline for producing a final copy.
Step 3: Package (Make Them Easy to Find and Use)
- Now that you’ve documented, simplified, and approved your core processes, the next step is rolling them out to the entire organization.
- Some people roll them out all at once.
- Others roll them out one core process at a time.
- Find the right format, medium, or platform by asking yourself:
- “What format or medium best fits this kind of work?”
- “How, when, and where will my people be using these tools?
- “Are they in the office? Or in the field?”
- “Are they at a desk in front of a screen all day? Or out in the field working with their hands?”
- “Is a document best? Or a checklist on a smartphone or tablet?”
- “Is it a document they can read better? Or is it a video they can watch over and over again?”
- Many organizations have turned to video content with a video library:
- YouTube
- Vimeo
- PlaybookBuilder
- Trainual
- Whale
- In the end, pick the tool and platform most likely to be simple, practical, and useful to the people who will be following the process every day.
- Make them easy to find
- Now that you’ve selected the right format, platform, or medium, make these valuable tools easy to find and use.
- Locate them as close to where the work is being done as possible.
- Organize each process so that employees can quickly and reliably access exactly what they’re looking for.
- The answer here depends on how the process was packaged and how and where the work is being done.
- The final step in this process is giving your “blueprint” or “operating model” a name – something accurate, memorable, and maybe even compelling:
- [Our Company] Way
- [Our Company] Playbook